


Slack is a collaborative messaging service that helps alleviate email fatigue, encourages digital collaboration, and clear communication between online teams. SWS has been relying on Slack to collaborate across distance since 2013. We’ve used it to run a company with offices across the country, facilitate foldA with every artist/volunteer/attendee/staff in a common workspace, and to stage manage a show in 4 cities at once.
- Separate work/personal communication tools
- Encourage inter-team collaboration and clear communication
- Organize conversations easily
- Alleviate email overload
This page will walk you through the process of creating a workspace, some basics about Slack, and offer some playful tips for becoming a #slacklord. If you’ve got any questions, slide join the foldA workspace and slide into @mariah.horner’s DMs or you can connect with SWS.
💥 SLACK BASICS 💥
Channels are chatrooms dedicated to certain topics. This is how you will communicate with members of your team. Channels can be project or team specific, but it is worth considering how you would like to organize your Slack workspace from the get-go.
Direct messages are for private communication.
Use threads and emojis! In order to keep communication clear, if you read a message, you can select the message and add an emoji below. If you are in a conversation with someone on slack, use a thread rather than an additional post. Click the message you are responding to and select “start thread”.
💥 GETTING SET-UP 💥
Step 1: Visit the Slack website. If you’d like to connect with a Slack representative directly, you can do so online.
Step 2: In the top righthand corner, select the purple button LAUNCH SLACK. Then select CREATE A NEW WORKSPACE. Follow the prompts to confirm your email address.
Step 3: After confirming your email address, you will begin to create a workspace. Slack will ask you “what is the name of your company or team” which will become the title of your workspace is and “what’s a project your team is working on” which will become the name of a channel.
Step 4: Slack will then ask you to invite teammates through email. You can invite a few here and you can also add members later on. You will also see a link that says “Get an invite link to share”. This way you can share your workplace through a link instead of an email invite.
Step 5: You will then be invited to see your first channel. We’ll explain below what a channel is. For now, select SEE CHANNEL and you will be invited to explore Slack through a tutorial helping you set up your workspace by messaging your channels, inviting contacts, and selecting a display name/password.
Step 6: For easy access on the go, you can instal the free Slack app on your Smartphone (iPhone, Android, etc.). You can also download the app on your desktop if using an Apple Mac or Windows. If you are not able to download Slack, you can still use a browser on your phone or laptop/computer to access the website and login.
💥 CHANNELS 💥
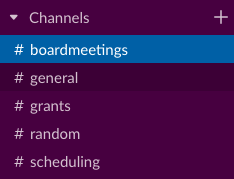 Think about Channels as chatrooms dedicated to certain topics or departments. This is how you can communicate with your team on specific topics, like email threads.
Step 1: Once you’re setup with Slack you will automatically be added to the #general channel, #random channel, and whatever channel you named during set-up.
Step 2: By clicking the + symbol next to the word Channels you can explore the other available channels in your workplace and add yourself to the relevant teams. If you are the workplace admin, you can add other channels. Some channels that may work for arts organizations include #grants, #scheduling, #fundraising and #boardmeetings.
💥DIRECT MESSAGING 💥
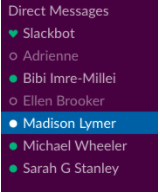 You can direct message anyone privately in your workspace.
Step 1: Along the left side of your screen, under “Channels” you’ll see “Direct Messages”, select the + to create a new direct message.
Step 2: Type in the name of the person you’d like to connect with, send them a message. You can add more than one person to a direct message if needed.
💥 NOTIFICATIONS 💥
Slack notifications are entirely customizable and have many options including the frequency of notifications and type of notification you receive.
Note that Slack does not always automatically send you notifications so it’s important to check and see that you are getting notifications.
Step 1: From the desktop version click on the bell to customize your notifications. From the app select the three dots next to the magnifying glass and then select the ‘Do Not Disturb’ bell.
Step 2: From both these locations you now have the option to temporarily snooze notifications. This is useful when you would like to work without disruption temporarily or over the weekend. Protip: you can also trigger this by using /dnd (TIME). Example: ‘/dnd Monday’ would snooze notifications until the following Monday
Step 3: In the web version select ‘Do Not Disturb Schedule’ and in the app select the three dots> settings>Do Not Disturb. You can then input your scheduled hours as to when you do not want to be notified. Note that this will cause notifications to turn off at the same time every day.
Step 4: In the web version scroll up to customize notification types and down to customize notification sounds. In the app go back to settings and select ‘Notifications’. Here you can select if you want to receive all messages or only messages specific to you.
Step 5: If you’re feeling extra adventurous you can customize your notifications to each channel. This is most commonly used to mute a channel like ‘Random’ and receive all notifications about your team specific channel. To do this, select the settings wheel in the web version or click on the channel name in the app. You will then be able to customize your preferences for that specific.
Note: Notification preferences are a matter of personal preference and should be set up in a way that suits your workflow best. If you’re eager to stay on top of all the Slack chat in the beginning leave your notifications to ‘All New Messages’, if you’re worried about adding another workspace to your life try testing ‘Direct messages, mentions, and keywords’.
💥OTHER SLACK HACKS💥
Think about Slack like you would facebook messenger, or group messaging on an iPhone. It’s an informal and collaborative way to connect both on a browser and on your mobile device.
Tag people in conversations! You can tag people in conversations by using @theirname.
Format your messages! To bold text *bold me* and to italicize text _italicize me_.
Add gifs! When you are in the desktop browser version of your Slack workspace (yourworkspacename.slack.com), select the workspace name in the top left corner and select SETTINGS AND ADMINISTRATION > MANAGE APPS. Select BROWSE APP DIRECTORY. In the search bar, type giphy. Then along the left, select ADD TO SLACK, then ADD GIPHY INTEGRATION. Note: only workplace admin can authorize the app integration.
Add custom emojis! From your desktop browser version of your Slack workspace (yourworkspacename.slack.com), open the emoji bar by clicking on the smiley face icon in the message field. Select ADD EMOJI then Upload Image to select a file. Select Upload Image. Enter a name for your emoji, then click Save. Note: only workplace admin can add custom emojis.
Return to main resource page to read more!
![]()


